
Becoming a homeowner goes hand in hand with a giant renovation list you dream of starting. From replacing fittings to upgrading your staircase, the list can seem endless! So DIY can be great in many ways! It can give you a sense of accomplishment, teach you a new skill and even save you money. However choosing the wrong venture can leave you feeling frustrated and out of pocket other projects are just plain dangerous for the average DIYer.
So before you start any renovation yourself you need to consider a few things…
Is the renovation worth your time and effort?
Is it going to save to money?
Do you have the skills/tools to complete the renovation to the standard you want?
Ok , Ok I’ve warned you of the pit falls and you’re still determined (good for you) but how do we get started?
If you are a novice to DIY renovations it is probably best to start small; test your skill set first. You could, for example, build a raised bed before you commence decking your back garden. Alternatively, if you feel you are a bit more experienced, you could try completing DIY on only part of a venture. For example you may hire a contractor to refit a bath and shower set but you may complete the small fittings and tiling yourself.
Start small…
Upgrading a room doesn’t always mean a complete overhaul. Often changing an element of the room can have just as much impact.
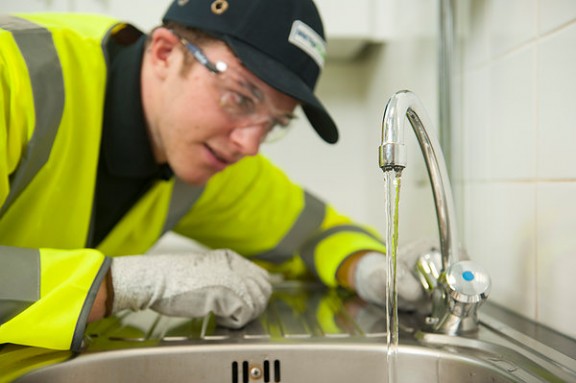
Why not try to replacing your bathroom fixtures?
- As with many things there is an easy way and a hard way. The easiest way to replace fittings is to buy new ones that are the same size, with the same fittings and with the same thread type.
- On the market today, you can usually get three types of faucet: Single hole, 4” triple hole and 8” triple hole.
- OK so you’ve selected your new fixtures and you’re ready to start. Assemble everything you need – there is nothing worth than getting to a specific part and realising you have to go and buy another tool to complete it.
- You will need: an adjustable wrench, pliers, the new fixtures, plumber’s putty, plumber’s tape, flexible water line extension, safety glasses and work gloves.
- First turn off the water valve (Remember while this is turned off you won’t be able to use the sinks or the toilet) and turn on the existing faucet so that any residual water is let out.
- Place a bucket beneath the working area, use the wrench to loosen and remove the existing flexible extension from the faucet. Drain the water and remove the line from the shut of valve.
- Remove any washers or nuts that secure the faucet. Remove anything else in this area such as the draining rod extension and the clamp bolt then remove the faucet itself. Depending on the age and condition of the fixture you may need to gently persuade it out its position.
- Generally speaking the new faucet will come with an installation manual which if followed correctly will apply to most fittings. Sometimes you will have to make slight modifications, such as swapping a gasket for plumber’s putty.
- In these cases you take a small amount of putty (a grey, clay like substance) and roll it between your fingers to produce a relative thin worm). Apply the length of rolled putty around the new spout. It will seal the connection and prevent water from dripping into the gap below.
- Install the new spout and tighten the mounting nut from below.
- Assemble the mixing valves (this only applies to single hole faucets). This will consist of a large nut, a washer which tightens the valve from underneath and a large washer and a C-clip which holds it from above.
- Install the top trims by threading them onto the mixing valve ensuring that the handle, prior to threading the trim, is parallel to the wall when in the off position. Then hook up the water lines from underneath. NB: Some faucets come with easy snap-end fittings but if they don’t, use plumber’s tape to secure any connections that do not have a rubber or gasket seal.
- Install the new water extension lines to the water valve.
- Reinstall the drain rod to the extension and tighten the clamp bolt.
- Before you finish and replace any external fitting (bath sides etc) double check you have tightened all your fittings and slowly turn on the shut off valves. We would do this on at a time.
- Look for any leaks. I there are none… CONGRATULATIONS J
- Leave the faucet on for approximately two minutes to test your handy work and to flush out anything in your new faucet.
- Stand back and admire your shining new fittings!
Now you have an insight into how long a renovation may take, how far your skills will take you and how much you enjoy the hands on approach so you can plan further endeavours.
Happy renovating!